Feeds:
Posts
Comments

Archive for the ‘chocolate’ Category


Best. Hamentashen. Ever. Made these last week. The crust on these is amazing. The filling is fantastic (I used almond butter instead of peanut butter), and I will definitely be trying other fillings with this amazing recipe, too.

Chocolate almond butter hamentashen (from one of my favorite blogs, Couldn’t Be Parve)

filling:

6 tablespoons almond butter

1/4 cup powdered sugar

1 stick (4 ounces) unsalted margarine

4 ounces unsweetened chocolate, coarsely chopped

3/4 cup sugar

1 teaspoon vanilla extract

1/4 teaspoon salt

2 eggs, cold

2 tablespoons AP flour

dough:

2 cups AP flour

1/2 teaspoon baking powder

1/4 teaspoon salt

1 stick (4 ounces) unsalted margarine

1 cup sugar

1 egg

2 teaspoons vanilla extract

To make filling: Combine the almond butter and powdered sugar. Stir until well mixed. Set aside. Melt the margarine and chocolate over a double boiler, stirring frequently until smooth. Alternatively, melt in a microwave in a medium bowl at 50% power, stirring every 30 seconds until melted. (this is what I did). Stir in the sugar, vanilla, and salt. Add the eggs, one at a time, stirring until fully incorporated before adding the other egg. Add the flour and stir with a spoon until the mixture is smooth and glossy, and the batter comes away from the side of the pan. Pinch off pea-sized pieces of the almond butter mixture and add to the chocolate batter. Repeat until the almond butter is used up. Stir the batter well to distribute the almond butter.

To make the dough: Thoroughly mix together the flour, baking powder, and salt. In the bowl of an electric mixer, cream together the margarine and sugar until light and fluffy. Beat in egg and vanilla extract. On low speed add flour mixture and beat until just incorporated. Form the dough into 2 flat patties. Wrap and refrigerate the patties until firm enough to roll, preferably several hours or overnight.

To make the cookies: Preheat the oven to 350 degrees F. Remove one of the dough patties and let it sit until soft enough to roll, but still firm. Roll the dough between two pieces of waxed or parchment paper until it is 1/8″ thick. Cut out rounds using a 3″ round cookie cutter or the rim of a drinking glass, dipping the edges of the cutter in flour as necessary to prevent sticking. Repeat with the remaining disk and the scraps.

Place the cookies 1/2″ apart on a parchment-lined cookie sheet. Scoop and place 1 level teaspoon of filling in the center of each cookie. Fold up the three sides of the cookie to make a triangle with the filling visible in the middle. Pinch the edges well to seal the corners.

Bake hamentashen until pale golden at the edges, about 12 minutes. Let sit for 2 minutes and then transfer to a cooling rack and let them cool completely.

Read Full Post »

Inspired by these sweet little things, I’m afraid that my macaroons did not make it to the sandwich level. I blame myself, as I made too hefty of a portion for each macaroon. But that certainly did not affect the taste. These were heavenly. I substituted almond milk, soy cream cheese, and margarine for the dairy requisites. I just love almonds and coconut and chocolate flavors altogether.

Coconut macaroons with chocolate drizzle

4 ounces soy cream cheese, softened

1/3 cup margarine, softened

1 cup superfine sugar

1 large egg

3 tablespoons almond milk

1 teaspoon almond extract

1 cup all-purpose flour

scant 1/2 teaspoon salt

2 cups finely shredded dessicated coconut

2 ounces almond paste

1/4 cup semi-sweet nondairy chocolate chips

In a large mixer bowl, combine the cream cheese, margarine, and sugar on low speed until well blended. Add in the egg, almond milk, and almond extract on low speed until combined.

In a small separate bowl, mix together the flour and salt. Add this into the above mixture and beat on low speed just until blended. continuing to beat on the lowest speed, gradually pour in all of the coconut; mix until combined. Pour in the grated almond paste until blended.

Wrap the dough in plastic wrap and press it into a disk. Chill it in the fridge for about an hour.

Preheat oven to 350 degrees F. Line a cookie sheet with parchment paper. Scoop about 1 1/2 tablespoon portions of the dough and place evenly onto the parchment, leaving a couple of inches between cookies. Bake the cookies for 10 – 12 minutes, until they just begin to turn lightly golden on top. Let them cool on the cookie sheets on a rack for about 5 minutes before removing them to the rack to finish cooling completely.

Slowly melt about 1/4 cup of chocolate chips in the microwave. Drizzle the chocolate over the cooled macaroons. Let it set before serving them. Store in an airtight container. Makes 20 – 25 cookies.

Read Full Post »

I’ve fallen in love with baked doughnuts. These were really good; so were these. And we just loved these. Time to add another donut recipe to the mix. I don’t know if it was the chocolate cake or the icing – these donuts were truly better than anything I’ve ever picked up from a bakery. And a ton healthier, too. It was interesting to add a little nutmeg to the chocolate, as the recipe called for – it gave the chocolate a decided different taste, but totally awesome, just the same.

Baked chocolate cake donuts (from HandleTheHeat blog, via Lara Feroni; nondairy adaptations by me)

1 cup AP flour

2 tablespoons cocoa powder

1 teaspoon baking powder

1/4 teaspoon baking soda

2/3 cup sugar

1/2 teaspoon freshly ground nutmeg

1/2 teaspoon fine grain salt

2 tablespoons margarine

1/2 cup soy yogurt, thinned slightly with a tablespoon soy milk

1 teaspoon vanilla extract

1 large egg

chocolate glaze (see below)

Lightly grease a donut tin and preheat the oven to 350 degrees F.

Sift the flour, cocoa powder, baking powder, and baking soda, and then whisk in the sugar, nutmeg, and salt. Add the margarine, and using your fingers, rub it into the dry ingredients until it becomes coarse crumbs.

In a separate bowl, whisk together the yogurt, vanilla, and egg. Add to the flour mixture and stir until just combined. Do not overmix, or your donuts may be a bit rubbery.

Fill a ziploc bag with the batter, cut an opening in one corner, and pipe the batter into each cup 1/2 to 3/4 full. It’s important not to overfill, or as the donuts rise, you’ll lose the hole.

Bake for 8 – 10 minutes, until the donuts spring back when touched. Let cool slightly on a wire rack before glazing.

Chocolate glaze:

4 tablespoons margarine

4 tablespoons almond milk, warmed

1/2 tablespoon light corn syrup

1 teaspoon vanilla extract

2 ounces bittersweet chocolate, chopped

1 cup confectioners’ sugar, sifted

Combine margarine, almond milk, corn syrup, and vanilla in medium saucepan and heat over medium heat until margarine is melted. Decrease the heat to low, add the chocolate, and whisk until melted. Turn off heat, add the powdered sugar, and whisk until smooth. Place the mixture over a bowl of warm water and dip the donuts immediately. Allow glaze to set for 30 minutes before serving. Makes 6 donuts.

Read Full Post »

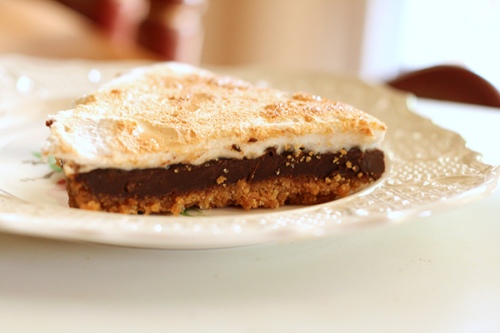
How good was this? Think Girl Scout camp, sticking a gooey roasted marshmallow in between two graham crackers layered with chocolate bars, then multiply the deliciousness by infinity. Nothing like homemade marshmallow – this was my first crack at it, and it was well worth the effort. I especially had fun licking out the bowl. This dessert is a new fav.

S’more tart (from Couldn’t Be Parve blog)

crust:

1 1/2 cups graham cracker crumbs

1/3 cup sugar

6 tablespoons margarine, melted

ganache:

1 cup (8 oz) unsweetened coconut milk, well mixed

9 ounces bittersweet chocolate, finely chopped

topping:

1/4 cup + 1 tablespoon cold water

2 teaspoons pure vanilla extract

1 1/2 tablespoons powdered gelatin

6 tablespoons cold water

10 tablespoons corn syrup

pinch of salt

3/4 cup granulated sugar

Preheat the oven to 375 degrees F. Generously grease a 9″ tart pan with a removable bottom, making sure to get all the way to the top of the pan. Mix all crust ingredients in a medium bowl. Press mixture firmly into the bottom of the prepared pan. Bake for 7-10  minutes, or until lightly browned. Place in the fridge while preparing the ganache.

Place chocolate in a large bowl. Heat coconut milk until just boiling. Pour hot coconut milk over the chocolate and let sit for 5 minutes. Whisk gently until completely smooth. Pour into the prepared crust and refrigerate until firm, at least one hour.

To make the marshmallow topping: combine the first three ingredients in a medium bowl and whisk until well blended and smooth. Set aside.

Combine second quantity of water, corn syrup, salt and sugar in a 4-quart saucepan and place over medium heat. When the mixture comes to a boil, do not stir. Let is cook for another 3 minutes, then remove pan from heat and carefully stir in gelatin mixture.

Pour the mixture into the bowl of an electric mixer fitted with the whisk attachment. Starting at medium speed, gradually increase the mixer speed to high. While the mixture is beating, remove the tart with the ganache from the fridge. Beat mixture for 10-12 minutes. When done it should look white and fluffy and the bowl will no longer be hot to the touch.

Using a wet spatula, scrape the mixture into the prepared pan on top of the ganache. spread into a smooth even layer. Set tart aside, uncovered, at room temperature, for at least 4 hours or overnight.

If desired, toast the top of the tart with a kitchen torch or broiler. (I would recommend the kitchen torch – I used the broiler and found the some of my marshmallow and ganache had gotten kind of gooey underneath, even to the point of drippy).

Read Full Post »

(Disclaimer: WARNING – may become addictive)

This is a pretty loose recipe. Use your favorite chocolate for melting (I used Whole Foods semi-sweet vegan chocolate chips. I find they have a par-excellent better chocolate flavor than almost any non-vegan chip I’ve tried). For the cheesecake filling, I found a great no-bake non-dairy cheesecake recipe here. And use the biggest, reddest, sweetest strawberries you can find.

Start this recipe a couple of hours before you’re ready to eat, as you need time for the chocolate shell to harden and get nice and cold. Plus you want to prepare your cheesecake filling and refrigerate that, too, for a couple of hours beforehand.

Eat these at  your own risk.

Chocolate-covered cheesecake-stuffed strawberries

1 quart of large, red, sweet strawberries (this will make you about 2 dozen little desserts), washed and patted dry

1 12-ounce bag of your favorite semi-sweet chocolate chips

1 tablespoon canola oil

your favored non-bake cheesecake recipe (see mine below)

Line a baking sheet with waxed paper.

In a medium saucepan, add the chocolate chips and the oil, and stir over medium-low heat until completely melted. Then, grab a strawberry by the stem and dip it in the melted chocolate, covering it 3/4 of the way towards the stem. Let any excess chocolate quickly drip off, then sit the strawberry on the waxed paper baking sheet. Repeat with the rest of the strawberries. Place the baking sheet with strawberries in the refrigerator for a couple of hours.

Meanwhile, prepare your cheesecake.

1 box extra-firm silken tofu

3 tablespoons lemon juice

1/4 teaspoon salt

1/2 teaspoon vanilla

3 tablespoons Tofutti cream cheese

1 1/2 tablespoons agar-agar flakes

3/4 cup almond milk

1/3 cup sugar

Place the tofu, lemon juice, salt, vanilla, and cream cheese in the bowl of your food processor, and process until smooth, scraping down the sides if necessary.

In a medium saucepan, heat the almond milk with the sugar and bring up to a simmer. Add the agar-agar and lower the heat to just below simmer. Simmer until the agar-agar has completely softened and blended into the almond milk. This took 15 minutes for me. Remove from heat, let it sit for 1 minute, then add in a slow stream to the tofu mixture in the food processor, while pulsing til smooth and completely blended. Place in a bowl and refrigerate for a couple of hours, covered.

To stuff the strawberries: Cut off the stem of the strawberry, then take your knife and hollow out the inside. Take a healthy spoonful of cheesecake and fill the strawberry. Repeat til all strawberries are stuffed.


Read Full Post »

I love pecan pie, and really wanted to try this chocolate version. Can I say that I was disappointed? I found it a little too sweet and chocolate-y, but the most dismaying part was that it didn’t have that creaminess that regular pecan pie has – this was quite dense and hard. Tasty, yes, but not what I was expecting. I served it with some soy whipped cream, which worked well.

Chocolate Pecan Pie (from Food&Wine) – I made my own crust, but you can follow their recipe on the website

crust:

1 cup flour

1/8 teaspoon salt

6 tablespoons margarine, cold

2 to 3 tablespoons cold water

filling:

1 1/2 cups pecan halves

4 tablespoons margarine

6 ounces bittersweet chocolate, broken into pieces

1/2 cup light brown sugar

3 large eggs, lightly beaten

3/4 cup light corn syrup

1 teaspoon vanilla extract

pinch of kosher salt

soy whipped cream, optional

CRUST: Heat oven to 425 degrees F. Combine flour and salt in a large bowl; cut in margarine with fork until mixture resembles coarse crumbs. Stir in enough water with fork just until flour is moistened. Shape into a ball; flatten slightly.

Roll out ball of dough on a lightly floured surface into a 12″ circle. Fold into quarters and place into a 9″ pie pan; unfold, pressing firmly against bottom and sides. Trim any overhand, and crimp decoratively. Prick bottom and sides of crust with fork. Bake 8 – 10 minutes until golden. Remove from oven and cool. Reduce oven temperature to 350 degrees F.

FILLING: Spread the pecans on a baking sheet and bake for 5 minutes, stirring once. Transfer the pecans to a plate. In a small microwave-safe bowl, melt the margarine with the chocolate in a microwave oven. Stir until blended and smooth. Scrape the chocolate mixture into a medium bowl and add the brown sugar. Stir in the eggs, corn syrup, vanilla, and kosher salt, then stir in the pecans.

Pour the filling into the pie shell and bake for 40 – 45 minutes, or until set in the center. Let the pie cool completely. Serve with the soy whipped cream.

Read Full Post »

img_1463

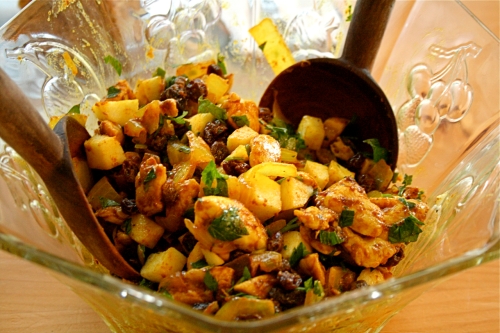
I miss salads. I don’t seem to make them very often in the winter, but it’s March now, and I must. have. salad. This one would probably taste good no matter what season you served it, but man was it great last night! Comes together easily, no exotic ingredients, and very high on taste. Enjoy!

Chicken curry salad

2 tablespoons extra virgin olive oil

1 1/2 pounds boneless chicken breast, cut into 1″ cubes

salt

1 yellow onion, roughly chopped

2 heaping teaspoons yellow curry powder

1 cup raisins

1 apple, peeled, cored, diced

1/2 cup chopped fresh cilantro

2 green onions, sliced

1 tablespoon mayonnaise

Heat olive oil on medium-high in a heavy saute pan. Add the chicken pieces and cook, stirring frequently until just cooked through. Sprinkle some salt on the chicken pieces while cooking. Remove chicken from pan and set aside.

Add yellow onion and cook. After a few minutes, add 2 heaping tablespoons yellow curry powder. Cook a few minutes more, stirring frequently. As you stir, scrape up the stuck curry bits. Add raisins and cook another minute, stirring. Remove from heat and add mayonnaise, stir in. Add the chicken to the curry mixture and stir well, coating the chicken pieces well. (If you want, at this point, you can make the salad a day ahead of time).

When you are ready to serve, mix in the apple, green onions, and cilantro. Serves 4.

Read Full Post »

img_1194

I combined a couple of recipes together, and then made a modification of my own. I absolutely love chocolate soy milk, and thought that this would be the perfect place to utilize it. This cheesecake will not disappoint the chocolate lover in you, and it will pleasantly please the cheesecake lover in you, too. Enjoy!

Vegan chocolate cheesecake

crust ingredients:

1/2 cup graham cracker crumbs

1/2 cup whole wheat flour

1/4 teaspoon baking soda

1/4 teaspoon salt

1 tablespoon cocoa powder, unsweetened

1/4 cup brown sugar

1/4 cup apple sauce

1/4 teaspoon vanilla

cheesecake ingredients:

1 12-ounce package firm silken tofu

1 8-ounce container tofutti cream cheese

3/4 cup sugar

1/2 cup chocolate soy milk

2 tablespoons powdered cocoa, unsweetened

1/2 teaspoon vanilla

3 tablespoons cornstarch

Make the crust: Preheat oven to 375 degrees F. Spray a 9″ pie pan with nonstick spray. Mix together in a medium bowl all of the dry ingredients. Then add the applesauce and vanilla and stir to combine (you may have to use your fingers, but that’s okay). Press into the pie pan to line bottom and up the sides, as evenly as you can. Bake for 10 minutes and remove. Set aside to cool.

Make the cheesecake: Turn heat in oven down to 350 degrees F. Combine the tofu and the cream cheese in the food processor until smooth. Add the sugar, chocolate milk, and cocoa to the food processor, and process again til smooth. Then add the vanilla and cornstarch and process a final time til smooth. Pour into the graham cracker pie shell, and bake in oven for 50-55 minutes. Top may be slightly jiggly but almost set.

Cool on a rack then refrigerate completely before serving. Top decoratively with either chocolate or soy whipped cream, or your favorite topping. Or serve with no topping at all. It’s all good. Makes 8 servings.

Read Full Post »

img_1028

Add my name to the legions who are so glad to see Gina De Palma back on SeriousEats and posting more of her delicious recipes. These cookies looked so sweet (pun intended) and totally seasonal, too. For some unknown reason, mine didn’t flatten out in the oven during baking. But I still like how they look, and even more, how they taste. 5-star approval from my taste-testers tonight, too. 

Her original recipe called for butter, which I subbed with margarine, to make it dairy-free. Also, I had no pistachios on hand, so I chopped some pecans instead. I also left out the grated orange. Maybe these are the reasons why my cookies didn’t look like snowflakes? I may never know… until the next time I make these yummy bites. Enjoy!

Cocoa snowflakes

1/2 cup chopped pecans (or pistachios, as originally called for)

1 cup all-purpose unbleached flour

1 teaspoon baking powder

1/4 teaspoon kosher salt

5 tablespoons margarine

6 tablespoons unsweetened cocoa powder

1 cup granulated sugar

1 large egg

1 teaspoon pure vanilla extract

1 teaspoon golden rum

1 cup confectioners’ sugar for rolling

In a medium bowl, mix the flour, baking powder, and salt. Set aside.

Melt the margarine (don’t let it boil), and place it in the bowl of an electric mixer. Add the cocoa powder and mix on medium speed to thoroughly combine the ingredients. Beat in the granulated sugar, and then beat in the egg. Then beat in the vanilla and the rum, scraping down the sides to make sure everything is well incorporated.

On low speed, beat in the flour mixture halfway, then add the nuts, beating on low speed to combine the ingredients and form a soft dough. Switch to medium speed and beat for about 30 seconds to strengthen the dough and thoroughly incorporate the dry ingredients. Scrape the dough onto a sheet of plastic and wrap to form a neat package. Chill the dough for at least 4 hours or overnight.

When you are ready to bake the cookies, remove the dough from the fridge to slightly soften, and turn your oven on to 325 degrees F. Spray two cookie sheets or rimmed pans lightly with non-stick cooking spray and line them with parchment paper. Place the confectioners’ sugar in a shallow bowl.

Break off small pieces of dough and roll them in the palms of your hands to form 1/2 to 3/4″  balls. Roll the balls in the confectioners’ sugar to give a generous coat. Place the cookies on the prepared pans, and space them 1″ apart.

Bake for 8-10 minutes. Allow the cookies to cool on the sheets for 1 minute, then use a spatula to gently transfer them to cooling racks. Store in airtight container, for up to a week. Makes 3 1/2 to 4 dozen cookies.

Read Full Post »

Here is a very chocolatey sorbet, made with a coconut milk base. Very rich, and, topped with toasted coconut, very good. Shout out to David Lebovitz’ The Perfect Scoop for a dairy-free creamy delight!

Read Full Post »

Older Posts »